If you are looking to start your data analytics and visualization journey. There you are in the right place, as this blog post would guide you step by step on how to start. In data analytics and visualization, there are required software(tool) that you must have. You would need a personal computer(desktop or mobile computer; laptop) to be able to help you install the required software(tool).This required softwares(tools),must haves’ I should say is SQL software(for requesting data present in an offline or online database e.g. Oracle Database, Microsoft SQL Database, Microsoft Access Database amongst other),Python,Jupyter(Notebook), & Microsoft Power BI.Reteriating on what I earlier wrote above,this blog post from start to finish would be all about showing step by processes of accomplishing of accomplishing a task in the form of Images and Written programming codes. So start I would show you how to install and setup a database accessing software(tool) called Microsoft SQL Server Management Studio. To download the software, you have to visit the software website with an internet browser Microsoft edge, google chrome ,Firefox, etc on https://docs.microsoft.com/en-us/sql/ssms/download-sql-server-management-studio-ssms?view=sql-server-ver15 (version updates are released from time to time, do well to download the latest version stable version).


When on the webpage, Click on
Download Sql Server, after the next
page loads, scroll down till you see the download
a free specialized edition section, then click download now under Express(right).The
Sql Server management studio file would start downloading, on confirmation of
file download complete from the internet browser.Click directly on the file In the
downloads box or locate your files download path through the files app.


After clicking on the setup file,
series of steps are required from you the user. First select Basic as installation type, next accept the software license agreement,
after which you specify where to install
the sql server software.


If the steps are properly followed,
the software should install successfully, after which you can then launch the
software from the windows start menu, see Image below

On the software launch, an interactive window would pop up (see Image below), requiring your assistance to connect to a sql server. Select Database Engine as server type, this would enable you use an offline database for data analysis. The server name and authentication input boxes should automatically fill up with information. Check to see if the server name input box includes your correct computer name. The server name format is your own computer name\SQLEXPRESS e.g. if you renamed your computer name as “Michael” in the about section(see Image Below) of your personal computer OS,then the server name should be Michael\SQLEXPRESS.Failure to properly configure this section very well would make the software not to function properly. You would not be able to locally have a server running and even be able to connect to a local server that would enable you to practise analyse data with SQL. If everything is right as shown in the first image below, click on the connect button. You would be connected successfully to a local server, your own computer name\SQLEXPRESS server, in my case I have no computer logon password set, hence the User name and Password input boxes are set to ready-only. See Images below.


It is also possible to
possible to register your own server. By expanding the database engine within the registered
server pane and selecting local
server group, then clicking new
server registration. See Image below


Input the server name, then
from the drop box besides authentication field, select the authentication method,
you have five (5) options. This requires a little bit of expertise as other
authentication options aside from the windows authentication method would
require you to request separate login details. Click on test then save to successfully register a new server. You
can also connect to an existing server by clicking
on the file tab then clicking on connect object explorer, selecting the right
server credentials and clicking on ok. See Image below


· Next on this blog post would be to connect to a test database and table present in the Microsoft sql server management studio and begin data analysis. In Microsoft sql server management studio, there are four databases that come pre-installed with the software. You can know how many databases are utilising an active server(i.e. a server that you have successfully connected to) by clicking on the view tab inside the software and selecting object explorer details or press f7 on your keyboard. A window having information containing how many databases are utilising an active server would pop up. See Images below.


We can now go ahead and
retrieve information from a pre created database within the software as part of
the data analysis process. We would be retrieving data from the master database,
one of the pre created database available with a freshly installed Microsoft
sql server management studio. See Images and code snippets below.


You can know the number of
tables present in a database by right clicking on the database and selecting reports from the pop-up menu and standard report then data classification. In our test database, master, it has five (5) tables
containing data stored in it. See Image below.


Series of sql function
keywords can be used to retrieve information from the database table. Some of
this function keywords are SELECT,ALIAS,FROM,WHERE,GROUP,HAVING,ORDER
BY,COUNT,DISTINCT,JOIN(INNER,OUTER,LEFT,RIGHT),AND,BETWEEN,OR,IN,LIKE,IS LIKE,
Wild card(%),IS NULL,SUM,AVERAGE,can also be prove useful. Below are the written
codes containing the sql function keywords to successfully retrieve data from
the master database and one of the tables (dbo. MSreplication_options)
under the master database containing fields (columns or headers) and rows (records
or information) as well as its Image outputs. You can replicate same step with
the codes.

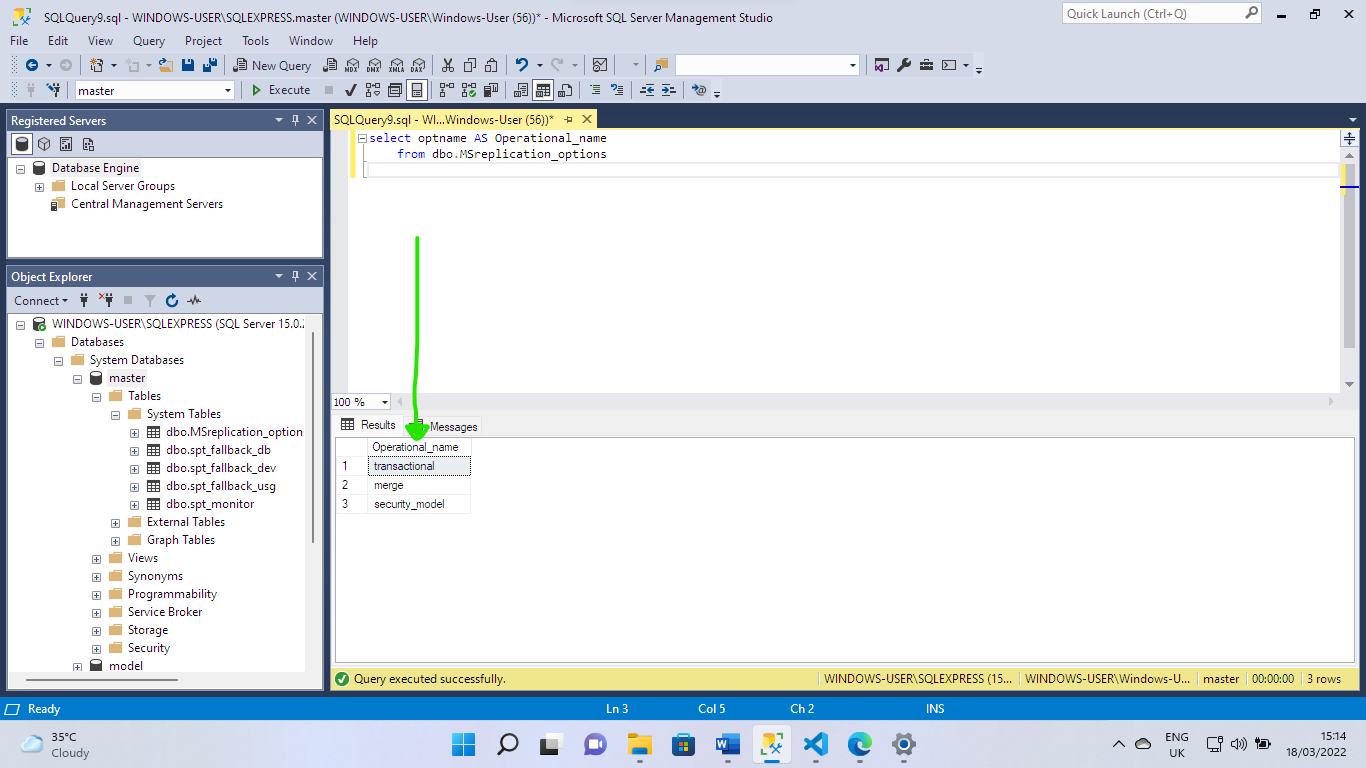
Here is a sql code selecting just one column (field or header) from the available six (6) columns and renaming the column header(field) using alias. The original column name was optname. Image snapshot is provided after the code below.
This code below displays the count
(total number) of all rows present in the aliased table as operational_name
above. Snapshot of the code below.

The dbo. MSreplication_options table inside the master database is not giving us much opportunity to explore, so we are going to import an external database and continue data analysis with it. The URL to download the external dataset after download completion that would be used for further analysis is https://github.com/Microsoft/sql-server-samples/releases/download/adventureworks/AdventureWorks2019.bak the database present in the just given GitHub URL is a backup file,meaning it is backup file of a database, in this case, the adventure works sample database provided by Microsoft. To make use of the sample database file downloaded as .bak (.bak is short form of backup),the downloaded sample database would have to be present in a backup folder present inside the server management studio main folder, the file path in own case is C:\Program Files\Microsoft SQL Server\MSSQL15.SQLEXPRESS\MSSQL\Backup, having the backup file inside of the backup folder is important, as this would make it possible for Microsoft sql server management studio to detect the presence of a .bak database file. After successfully copy the sample database file to the backup folder, we need to make use a restore feature present in the Microsoft sql server management studio software. This restore feature called restore database can be accessed by right clicking on the database folder, already present in a freshly installed Microsoft sql server management studio software, and selecting restore database, then selecting device button option in the pop up menu within the source selection section, then clicking on the three dotted box, right of the source selection section, selecting file as backup media type, which can be accessed by clicking on a drop down button, after which you click on add and then finally selecting the required database name to restore from the available backup databases, then click on ok. See Images below.


Now we would continue our
data analysis but with a new database, recollect the reason why? I am sure you do.
I would now resume the step by step guide of showing you how to perform intense
data analysis with sql. The below code yields (see Image below).

You can know the total number
of rows in table using the below sql code.

N.B:There are 395 rows.
ASCENDING ORDER
To sort your data in sql,you can
use the order by sql keyword,demonstrated in an sql code

DESCENDING
ORDER
To sort your data in sql,you can
use the order by sql keyword,demonstrated in an sql code


Can you physically see the difference?
You can also use the where keyword in sql to
filter your data. Below is the sql code

N.B: You can
observe your dataset present in sql database form before analysing by using select *, this would enable you carry WHERE/OR operations very well in sql.
Below is an OR operator sql code.


· THE END Linktree
Comments
Post a Comment